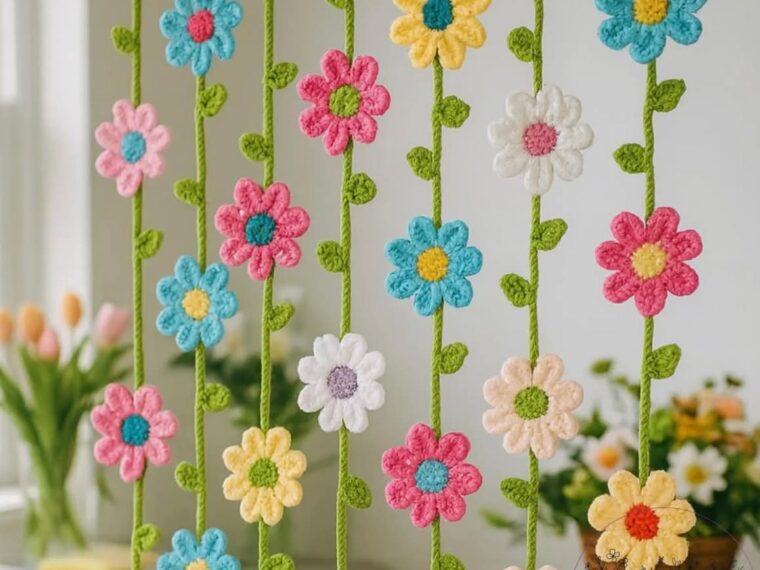
Flower Crochet Hanging Garland – LOVE
A Beautiful Handmade Decoration You Can Create Yourself
A crochet flower hanging garland is one of those projects that feels both simple and magical. With just yarn, a hook, and a little time, you can create a soft, romantic decoration perfect for bedrooms, weddings, nurseries, windows, or walls. Add the word LOVE, and it becomes a meaningful handmade piece full of warmth.
This article will guide you through everything you need to know, even if you’re new to crochet.
Why Make a Crochet Flower Garland?
- 🌸 Handmade and personal
- ♻️ Low-cost, uses small amounts of yarn
- 🧘 Relaxing and mindful craft
- 🏡 Perfect for home décor or gifts
- ❤️ The word LOVE makes it symbolic and timeless
What You’ll Need
Materials
- Cotton or acrylic yarn (medium weight / worsted)
- Flower colors (pink, white, yellow, lavender, etc.)
- Green (optional, for leaves)
- One main color for the letters
- Crochet hook (4 mm – 5 mm recommended)
- Yarn needle
- Scissors
- Wooden stick, branch, or dowel (for hanging)
- String or yarn for hanging loops
Basic Crochet Skills Required
You only need to know:
- Chain (ch)
- Slip stitch (sl st)
- Single crochet (sc)
- Double crochet (dc)
Perfect for beginners 🌱
Part 1: How to Crochet a Simple Flower
Step 1: Make the Center Ring
- Chain 4
- Join with a slip stitch to form a ring
Step 2: Create the Flower Center
- Chain 2
- Work 10 double crochets into the ring
- Join with a slip stitch
Fasten off if changing color.
Step 3: Crochet the Petals
Attach petal color.
For each petal:
- Chain 2
- 2 double crochets in the same stitch
- Chain 2
- Slip stitch into the next stitch
Repeat around to form 5–6 petals.
Fasten off and weave in ends.
🌸 You now have one flower!
Make as many as you like — most garlands use 7–15 flowers.
Part 2: Optional Crochet Leaves
- Chain 6
- Single crochet in second chain from hook
- Half double crochet
- Double crochet
- Half double crochet
- Single crochet
- Slip stitch back down the chain
Attach leaves to flowers or directly to the garland string.
Part 3: How to Crochet the Letters (L O V E)
Letters are made using simple chains and single crochet shaping.
General Method
- Chain the letter outline
- Single crochet back along the chain
- Shape corners using extra stitches
- Fasten off and leave long tails for sewing
Each letter should be 8–12 cm (3–5 inches) tall for balance.
You can:
- Freehand the letters
- Or follow graph paper patterns (recommended)
Part 4: Assemble the Garland
Step 1: Prepare the Base String
- Chain a long strand (or cut yarn/string)
- Length depends on your space (usually 80–120 cm)
Step 2: Arrange Your Design
Lay everything flat first:
- Flowers evenly spaced
- Letters centered spelling LOVE
This helps avoid mistakes.
Step 3: Attach the Pieces
Using a yarn needle:
- Sew flowers onto the string
- Attach letters securely
- Add leaves if desired
Make sure everything hangs straight.
Part 5: Add the Hanging Rod
- Tie each end of the garland to a wooden stick or branch
- Add extra string on both ends for hanging
You can hang it on:
- A wall
- A door
- A window
- A shelf
- A crib wall (out of reach)
Customization Ideas
- 💕 Use pastel or bold colors
- 🌼 Add beads to flower centers
- ✨ Mix flower sizes
- 🎁 Make mini versions as gifts
- 📿 Add tassels at the ends
Care Instructions
- Hand wash gently in cold water
- Lay flat to dry
- Store folded, not hanging, to keep shape
Final Thoughts
A Flower Crochet Hanging Garland – LOVE is more than decoration.
It’s:
- Time invested
- Care stitched in
- Love made visible
Whether you make it for your home or as a gift, it carries something store-bought décor never can — your hands and your heart.