Introduction: The Home Cook’s Quest for the Perfect Crunch
For decades, the culinary world has maintained a strict “regulations” manual on chicken wings: if you want them crispy, you must submerge them in bubbling oil. However, modern home cooking has staged a revolution. We are deconstructing those old-school rules to prove that your oven is actually a high-performance convection machine capable of producing a chef’s kiss wing that rivals any deep-fried version found in a sports bar.
This recipe isn’t just a set of steps; it’s a weeknight rescue for the health-conscious foodie. By utilizing specific thermal principles, we can transform a standard 2 lb bag of wings into a soooo good masterpiece of texture and flavor. We are moving away from the “greasy bucket” aesthetic and towards a classy look platter that features blistered skin, succulent meat, and a spice profile that hits every note of the palate. This is the recipe you’ve been searching for—don’t lose it!
The secret lies in “The Regulation of Moisture.” To achieve the ultimate crunch, we must manage the water content of the skin and the rendering of the subcutaneous fat. This article will guide you through the chemical and physical transformations that occur at 200°C (400°F), turning a humble poultry cut into an artisanal appetizer.
Ingredients: The Flavor and Texture Toolkit
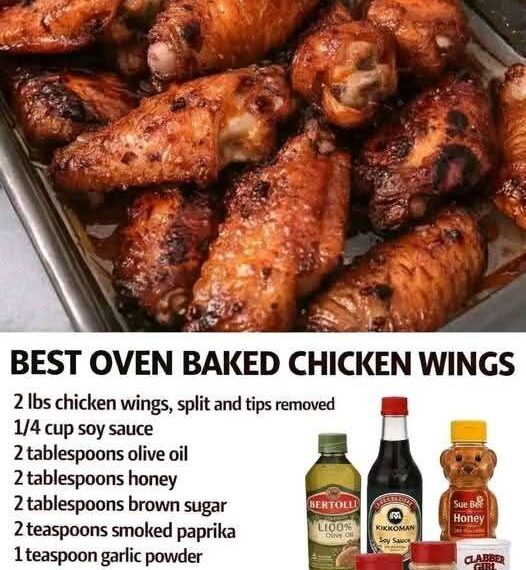
- 2 lbs Chicken Wings: Ideally a mix of “flats” and “drumettes.” Ensure they are fully thawed if previously frozen.
- 2 tablespoons Olive Oil: This acts as a heat conductor, helping the dry spices bond to the skin and encouraging even browning.
- 1 teaspoon Garlic Powder: Provides a savory, umami-rich base that permeates the meat during the roasting process.
- 1 teaspoon Onion Powder: Offers a subtle sweetness and aromatic depth that balances the sharper garlic.
- 1 teaspoon Paprika: Primarily for a classy look golden-red hue, but it also adds a mild earthy flavor.
- Salt & Black Pepper: To taste. Salt is the most important “regulatory” agent here, as it draws out moisture from the skin to help it crisp.
- Pro Secret (Optional): 1 teaspoon of aluminum-free baking powder (this is the “regulatory” hack for extra-blistered skin).
Instructions: The 360-Degree Roasting Method
Following these instructions is vital. The “regulation” of airflow is what separates a soggy wing from a soooo good crunchy one.
- The Desiccation Phase: Preheat your oven to 200°C (400°F). Take your wings and pat them painstakingly dry with paper towels. If the skin is wet, it will steam rather than sear.
- The Coating Regulation: In a large mixing bowl, whisk together the olive oil and all dry spices. Toss the wings in the mixture, using your hands to ensure every nook and cranny is coated.
- The Engineering Setup: Line a large baking sheet with aluminum foil (for easy cleanup). Place a wire cooling rack on top of the sheet. This allows hot air to circulate under the wings, cooking the bottom as effectively as the top.
- The Spacing Rule: Arrange the wings on the rack. They must not touch. Crowding the pan creates a “moisture trap” that will soften the skin.
- The Thermal Transformation: Place the tray in the center of the oven. Bake for 45–50 minutes. You do not strictly need to flip them if using a rack, but a mid-way flip at 25 minutes ensures a chef’s kiss uniform color.
- The Final Crisp: If you want them extra dark, move the tray to the top rack for the final 5 minutes of cooking.
Serving and Storage: Maintaining the Integrity
How to Serve
To maintain that classy look, serve the wings on a wooden board or a white ceramic platter. Pair them with traditional cooling agents like celery sticks and a side of ranch or blue cheese dressing. For those who prefer “wet” wings, toss them in a bowl with your favorite sauce immediately before eating to preserve the crunch.
Storage Regulations
Leftovers should be cooled to room temperature before being placed in an airtight container. They will last in the refrigerator for up to 4 days. Important: To reheat, avoid the microwave at all costs—it will turn the skin rubbery. Instead, use an air fryer or oven at 190°C for 5–8 minutes to restore that soooo good texture.
Tips: The Science of “The Crunch”
To truly master these wings, you must understand the “regulatory” role of pH levels. Adding a teaspoon of baking powder to your dry rub is a chef’s kiss secret. The alkaline nature of the powder breaks down the peptide bonds in the chicken skin, allowing it to brown more deeply and develop tiny air bubbles that result in a shattered-glass texture.
Variations: Expanding the Flavor Profile
Once you have mastered the base “regulations,” you can experiment with these soooo good alternatives:
- The Lemon-Pepper Twist: Omit paprika and onion powder; add 2 tsp of cracked lemon pepper and fresh lemon zest.
- The Smokey BBQ: Replace regular paprika with smoked paprika and add a pinch of brown sugar to the rub.
- The Spicy Bayou: Add 1/2 tsp of cayenne pepper and a dash of dried oregano for a Cajun-style kick.
Tips: Temperature Management
Always use a meat thermometer to ensure “food safety regulations” are met. Chicken wings are technically safe at 74°C (165°F), but they are actually soooo good when cooked to 82°C (180°F). At this higher temperature, the collagen in the wings breaks down into gelatin, making them “fall-off-the-bone” tender.
Conclusion: A New Era of Wing Night
By following these oven-baked “regulations,” you have successfully bypassed the mess and calories of the deep fryer without sacrificing an ounce of flavor. This weeknight rescue recipe is designed to be consistent, delicious, and impressive. It’s a classy look meal that proves simple ingredients, when managed with the right techniques, create the most memorable dining experiences. Enjoy your perfect, crispy wings—you’ve earned them!
Frequently Asked Questions
Can I bake them directly on the pan?
You can, but you’ll need to flip them every 15 minutes. Without a rack, the bottom of the wing sits in its own rendered fat and will never reach a chef’s kiss level of crispiness.
Why pat the chicken dry?
Surface moisture creates steam. Steam prevents the “Maillard reaction” (the browning process). For the best results, pat them dry and let them sit uncovered in the fridge for 30 minutes before seasoning.
How many wings per person?
For an appetizer, 6–8 wings is standard. For a weeknight rescue main course, aim for 12–15 wings per person.