Lavender (Lavandula) is a fragrant, hardy herb that adds beauty, aroma, and versatility to your garden and home.
While buying lavender plants can be expensive, propagating lavender from cuttings is a cost-effective and rewarding way to grow more plants. Lavender cuttings are easy to root with the right techniques, and they grow into healthy, vibrant plants more quickly than seeds.
Here’s a detailed guide on how to propagate lavender from cuttings and care for the new plants to ensure success.
Why Propagate Lavender from Cuttings?
- Cost-Effective: Propagation saves you money compared to buying new plants.
- Faster Growth: Cuttings grow faster than starting from seeds, which can take months to germinate.
- Clone Your Favorite Plant: Cuttings ensure the new plant is genetically identical to the parent plant, preserving its fragrance and hardiness.
- Sustainable Gardening: Reuse existing plants to expand your garden.
When to Take Lavender Cuttings
The best time to take lavender cuttings depends on the type of cutting:
- Softwood Cuttings:
- Taken in late spring or early summer.
- Use young, flexible stems that are not too woody.
- Root quickly but are more delicate.
- Semi-Hardwood Cuttings:
- Taken in late summer or early fall.
- Use stems that are partially mature with a firmer texture.
- Root slower but are sturdier and more resilient.
What You’ll Need
Before you start, gather the following materials:
- Healthy lavender plant (parent plant).
- Sharp scissors or pruning shears.
- Rooting hormone (optional, but improves success rates).
- Small pots or trays with drainage holes.
- Well-draining potting soil (a mix of sand, perlite, and peat works best).
- Clear plastic bag or humidity dome.
- Spray bottle for misting.
Step-by-Step Guide to Growing Lavender from Cuttings
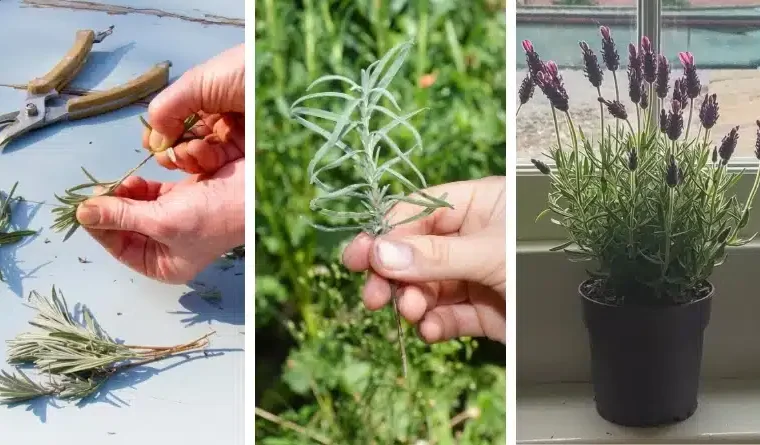
Step 1: Choose the Right Stem
- Select a healthy, non-flowering stem from the parent plant.
- Look for a stem that is 4–6 inches long, with no signs of disease or damage.
- Avoid woody or overly mature stems, as they are harder to root.
Step 2: Prepare the Cutting
- Using clean, sharp scissors or pruning shears, cut the stem just below a leaf node (the point where leaves meet the stem).
- Remove the lower leaves from the bottom two-thirds of the cutting, leaving only a few leaves at the top.
- If the stem has flowers, remove them to redirect energy toward root development.
Step 3: Apply Rooting Hormone (Optional)
- Dip the cut end of the stem into rooting hormone powder or gel.
- Rooting hormone isn’t essential for lavender, but it increases the success rate, especially for semi-hardwood cuttings.
Step 4: Plant the Cutting
- Fill a small pot or tray with well-draining potting mix. A mix of sand, perlite, and peat is ideal for lavender cuttings.
- Make a hole in the soil using a pencil or stick.
- Insert the cutting into the hole, ensuring the stripped section of the stem is buried. Gently press the soil around the stem to secure it.
Step 5: Provide Humidity and Light
- Cover the pot or tray with a clear plastic bag or humidity dome to maintain moisture. Make sure the plastic doesn’t touch the cutting.
- Place the pot in a bright location with indirect sunlight. Avoid direct sunlight, as it can scorch the cutting.
Step 6: Water and Maintain
- Mist the cutting daily with a spray bottle to keep the soil slightly moist but not waterlogged.
- Check for signs of mold or rot, and ensure proper ventilation under the humidity dome.
- Avoid overwatering, as lavender prefers slightly dry conditions.
How to Know When the Cutting Has Rooted
- Timeframe: Lavender cuttings typically take 3–6 weeks to develop roots.
- Signs of Rooting: Tug gently on the cutting. If you feel resistance, roots have formed.
- New Growth: Once roots are established, the cutting will begin to produce new leaves.
Step 7: Transplant the Cutting
- Once the cutting has rooted and shows signs of new growth, it’s time to transplant it into a larger pot or directly into the garden.
- Use well-draining soil, and plant in a location with full sunlight.
- Water sparingly, allowing the soil to dry out between waterings.
Tips for Success
- Choose Healthy Parent Plants: Only take cuttings from disease-free and robust lavender plants.
- Sanitize Tools: Clean scissors or shears to prevent the spread of disease.
- Avoid Overwatering: Lavender thrives in dry, well-drained conditions.
- Be Patient: Propagation may take a few weeks, so don’t rush the process.
- Prune Regularly: Prune mature plants to encourage bushier growth and prevent woodiness.
Common Problems and Solutions
1. Cutting Wilts or Rots
- Cause: Overwatering or poor ventilation.
- Solution: Reduce watering and ensure the humidity dome has small ventilation holes.
2. No Root Development
- Cause: Cutting may be too woody or environmental conditions are unsuitable.
- Solution: Use softwood cuttings and ensure consistent humidity and warmth.
3. Mold or Fungal Growth
- Cause: Excess moisture or poor airflow.
- Solution: Remove affected cuttings and improve air circulation.
Why Grow Lavender from Cuttings?
- Aromatic Benefits: Enjoy fresh lavender for essential oils, sachets, and DIY crafts.
- Eco-Friendly: Save resources by propagating instead of purchasing new plants.
- Versatile Use: Lavender can be used for culinary purposes, natural remedies, and garden borders.
Growing lavender from cuttings is a rewarding and budget-friendly way to expand your garden.
With the right techniques and a little patience, you can successfully propagate lavender and enjoy its beauty and fragrance for years to come.