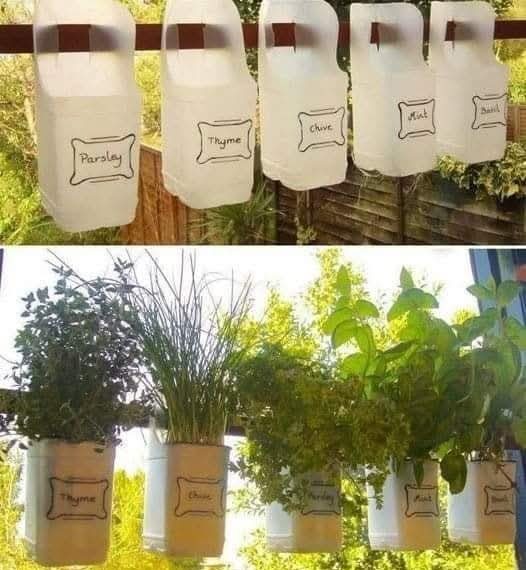
This plastic bottle herb garden project was submitted by Sylvie Leost . Sylvie is a recycling guru who loves to upcycle discarded waste into useful and resourceful items. Make sure you pay her a visit on her Facebook page Not Just Trash to see more of her creative recycling ideas .
This hanging herb garden is also a great way to declutter the kitchen counters, dont you think? Now, empty milk bottles on the ready? Yes? Over to Sylvia for the tutorial- Medina Grillo
Indoor Bottle Herb Garden – From Recycled Milk Bottles
Creating an indoor herb garden is a fantastic way to add a touch of nature to your living space while enjoying fresh herbs for cooking. One creative and environmentally friendly way to set up such a garden is by recycling old milk bottles. By transforming these everyday items into planters, you can give them a second life, reduce waste, and cultivate a beautiful indoor garden. Below is a step-by-step guide on how to make an indoor herb garden using recycled milk bottles.
Materials Needed:
- Empty milk bottles (preferably plastic)
- Scissors or utility knife
- Potting soil
- Herb plants or herb seeds (e.g., basil, mint, parsley, rosemary)
- Drainage rocks or pebbles
- A marker or pen
- A small hand shovel or spoon
- Decorative elements (optional, like paint or stickers)
Step-by-Step Guide:
1. Prepare the Milk Bottles
The first step is to clean and prepare your milk bottles. Thoroughly rinse them with warm water and soap to remove any remaining milk residues and odors. Allow them to dry completely before starting the transformation.
2. Cut the Bottles
Using scissors or a utility knife, carefully cut the milk bottles in half or at a height that suits your design preferences. You can either create a shallow planter or a deeper one, depending on how much space the plant roots will need. A half-bottle (or roughly two-thirds of the bottle) works well for most herbs.
3. Create Drainage Holes
Herbs need well-draining soil to thrive. To achieve this, you’ll need to create drainage holes at the bottom of each milk bottle. Use a knife, nail, or a pair of scissors to punch a few holes. This will ensure that excess water can drain away and prevent root rot.
4. Add Drainage Layer
Before filling your milk bottle with soil, it’s a good idea to add a small layer of drainage rocks or pebbles at the bottom of the bottle. This helps improve drainage and prevents soil from clogging the holes, ensuring that your herbs won’t sit in water. A layer about 1-2 inches deep is sufficient.
5. Fill with Potting Soil
Fill the bottle with good-quality potting soil, leaving about an inch of space from the top. Gently pat down the soil to remove air pockets, but don’t compact it too much, as your herbs need loose, aerated soil to grow well.
6. Plant Your Herbs
Now it’s time to add your herbs. If you are using seedlings, carefully remove them from their original pots and plant them in the milk bottle planter. If you’re using seeds, sprinkle them evenly on top of the soil and lightly cover them with a thin layer of soil. Be sure to follow any specific planting instructions for the herbs you’re using, such as spacing or depth recommendations.
7. Water the Herbs
After planting, water the herbs gently to settle the soil. Be cautious not to overwater, as the herbs should not sit in excess water. A light, even watering every few days is usually enough. Make sure the drainage holes work effectively, and excess water can escape.
8. Position the Bottles in a Sunny Spot
Herbs require a good amount of sunlight to grow, so place your milk bottle garden in a bright area, such as near a sunny window. Most herbs, such as basil, parsley, and rosemary, need about 6-8 hours of sunlight each day. If you don’t have a lot of natural light, consider using grow lights to supplement.
9. Maintain and Harvest
Keep an eye on your herbs as they grow. Trim them regularly to encourage new growth and prevent them from becoming too leggy. Harvest leaves as needed, but don’t over-harvest the plant at once. Allowing your herbs to grow fully ensures a continuous supply of fresh leaves.
Additional Tips:
- Label Your Plants: If you have multiple herbs, consider labeling each one using small wooden tags, popsicle sticks, or a marker on the milk bottle. This helps keep things organized and ensures you know which herb is which.
- Decorate the Bottles: If you’re looking for a more aesthetic look, consider decorating your milk bottles with paint, stickers, or twine. This not only adds to the charm but also helps the bottles blend in with your home décor.
- Multiple Bottle Planters: You can create a larger herb garden by using multiple milk bottles. Line them up on a windowsill, kitchen counter, or even hang them vertically for a more creative display.
- Use Vertical Space: If space is limited, try hanging your milk bottle planters on the wall using sturdy hooks or strings. This creates a vertical garden and saves space while still giving you access to fresh herbs.
Benefits of an Indoor Bottle Herb Garden
- Sustainability: By reusing milk bottles, you’re keeping plastic waste out of landfills and giving these containers a second life. This is an eco-friendly and sustainable approach to gardening.
- Cost-Effective: Starting an herb garden from recycled bottles is a budget-friendly option. You don’t need to buy fancy planters or gardening pots, and you can often find seeds for herbs at a low cost.
- Convenience: Having fresh herbs at your fingertips is convenient when cooking. You don’t have to make trips to the grocery store every time you need a few sprigs of parsley or a pinch of basil.
- Health and Wellness: Growing your own herbs at home means you’re getting fresh, pesticide-free herbs for your meals. It’s a simple way to add more nutrition to your diet.
- Decorative Touch: An indoor herb garden can add natural beauty to your home. The vibrant green of the herbs, along with the unique and rustic look of the milk bottle planters, will brighten up your living space.
Conclusion
Transforming recycled milk bottles into planters for your indoor herb garden is a simple, sustainable, and rewarding project. With minimal effort and a bit of creativity, you can cultivate fresh herbs all year long while reducing waste. It’s an easy way to bring the outdoors inside and enjoy the fruits (or rather, the herbs) of your labor. So, gather your empty milk bottles and get started on your very own indoor herb garden today!