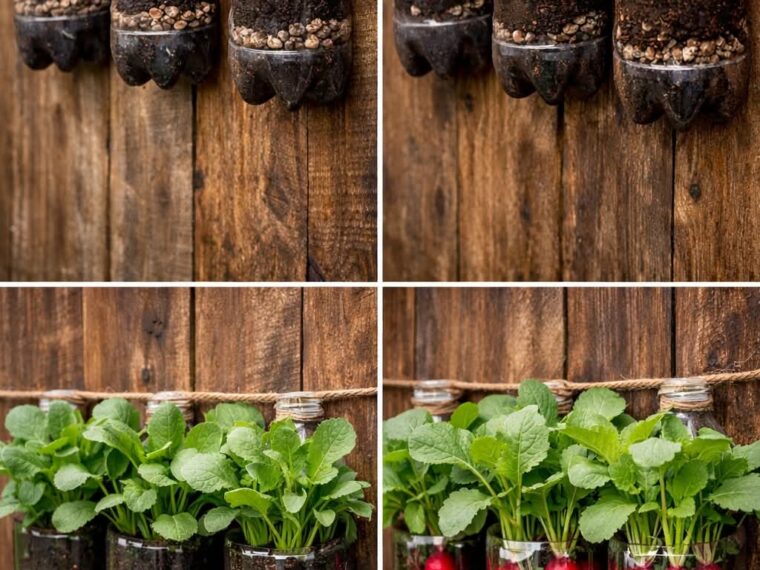
Radishes are among the easiest and fastest vegetables to grow, making them perfect for beginner gardeners and anyone short on space. With a little creativity, you can grow crisp, peppery radishes in wall-mounted bottle pouches—an ideal solution for small balconies, patios, or even indoor spaces with adequate sunlight. This vertical gardening technique turns used plastic bottles into productive growing pouches that are cost-effective, eco-friendly, and surprisingly efficient.
Here’s how you can start growing radishes in your own wall-mounted bottle garden, even with limited space.
Why Grow Radishes in Bottles?
Radishes are compact, fast-growing root vegetables that don’t require deep soil or extensive care. They thrive in containers, especially when given good drainage and sufficient sunlight. Using recycled plastic bottles allows for vertical arrangement, saving valuable ground space and reducing waste. Since radishes mature quickly—some in as little as 25 days—you’ll be harvesting your own fresh produce in no time.
This method also keeps pests at bay and allows for better air circulation, minimizing the risk of disease and root rot. Wall-mounted bottle pouches offer great accessibility for daily care, watering, and harvesting.
What You’ll Need
To set up your vertical radish garden, gather the following supplies:
- 1.5 or 2-liter plastic bottles (cleaned and label-free)
- Scissors or a utility knife
- Nail or screwdriver (for drainage holes)
- Lightweight potting soil or compost mix
- Organic fertilizer (optional)
- Radish seeds (fast-growing varieties like Cherry Belle, French Breakfast, or Sparkler)
- Mounting material: screws, nails, zip ties, or a wooden rack
Preparing the Bottles
- Cut Openings for Planting:
On the side of the bottle, cut a horizontal slit large enough to create a pouch-like opening. The slit should be about 4–5 inches long and 2–3 inches wide. This will act as the planting pocket. - Make Drainage Holes:
Using a heated nail or screwdriver, poke several holes in the bottom of the bottle to allow excess water to escape. - Add Mounting Holes:
If you’re hanging bottles individually, pierce two holes near the top to run wire or rope through for hanging. If attaching to a rack, screw through the bottle’s back into a wooden board.
Filling and Seeding
- Soil Preparation:
Use a well-draining potting mix rich in organic matter. Avoid heavy or clay soils, as radishes need loose soil for proper root development. Mix in a handful of compost or a slow-release organic fertilizer before planting. - Filling the Bottles:
Fill each bottle up to the planting slit with your prepared soil. Gently tamp it down, but avoid compacting it too much. - Sowing Seeds:
Plant 2–3 radish seeds per bottle pocket, spaced about 1 inch apart. Later, once the seedlings sprout, thin them to leave the strongest one or two per pouch. This gives each plant enough room to form round, healthy roots.
Mounting the Bottles
- Wall Setup: Choose a sunny wall or fence that gets 4–6 hours of sunlight daily. Screw or tie the bottles securely to the wall, making sure they are slightly tilted forward to prevent water pooling at the base.
- Rack or Frame: If you prefer a freestanding garden, attach bottles to a wooden frame or pallet leaning against a wall.
- Hanging Rows: For an indoor or balcony setup, you can hang bottles vertically using sturdy string, spacing each one enough to allow room for sunlight and air.
Ensure that the placement allows easy access for watering and harvesting.
Care and Maintenance
Watering:
Radishes need consistently moist soil, especially during germination and root formation. Water lightly once or twice daily, depending on your climate. Make sure the soil stays damp but not soggy.
Sunlight:
Radishes grow best in cooler temperatures with plenty of sunlight. Provide at least 4–6 hours of direct sun daily. If growing indoors, place your bottles near a bright window or supplement with grow lights.
Feeding:
Radishes usually don’t need heavy fertilization. However, you can apply a diluted liquid fertilizer once midway through the growing cycle for better root development.
Thinning:
Once seedlings are a few inches tall, thin them out by snipping the weaker sprouts. Proper spacing ensures your radishes grow large and round instead of spindly or misshapen.
Harvesting Radishes
Radishes are ready for harvest about 25–30 days after planting, depending on the variety. Check the tops of the roots near the soil surface—if they’re about 1 inch wide, they’re ready. Gently pull the radish from the bottle pouch and brush off the soil.
Don’t wait too long to harvest, or they can become woody and overly spicy.
Variety Tips for Bottle Growing
Choose small or round radish varieties for better results in shallow soil:
- Cherry Belle: A classic round, red radish ready in about 22 days.
- French Breakfast: Oblong shape with mild flavor, ideal for vertical growing.
- Sparkler: Red with a white tip, adds variety to your harvest basket.
Avoid long-rooted varieties unless you modify your bottles to be deeper.
Final Thoughts
Growing radishes in wall-mounted bottle pouches is not only a smart use of space but also an eco-friendly way to garden in urban environments. It offers fast results, low maintenance, and a fun, hands-on experience—whether you’re gardening on a small balcony, a fence, or even indoors. With just a few recycled bottles and a bit of care, you can enjoy crunchy, home-grown radishes with every meal.