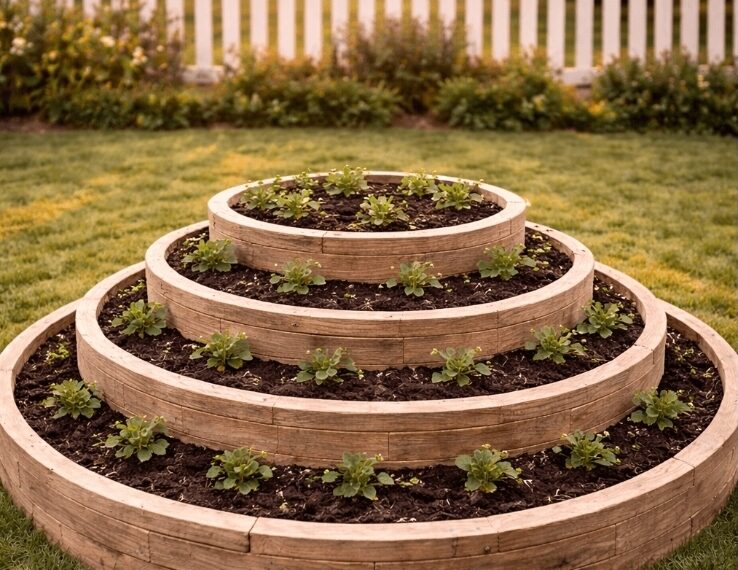
you want a beautiful and productive garden, a tiered strawberry planter is one of the best solutions. It saves space, looks amazing, and gives you a rich harvest of fresh strawberries 
What You Need:
- wooden rings or square wooden frames
- garden soil + compost
- strawberry plants
- screws or nails (for fixing)
How to Build It:
1. Choose the Location
Pick a sunny spot (at least 6–8 hours of sunlight daily).
2. Create the Base
Place the largest frame directly on grass or soil and fill it with soil.
3. Add the Levels
Place smaller frames on top and repeat the process.
You can build:
- 3 levels (simple)
- 5 levels (ideal)
- 6 levels (more impressive)
It depends on how many frames you have.
4. Fill Each Level
Add soil to every level and level it evenly.
Planting Strawberries:
- plant along the edges of each level
- leave space between plants (10–15 cm / 4–6 inches)
- gently press the soil around each plant
Recommended Sizes (Square Wooden Frames)
From bottom to top:
- Level 1: 120 × 120 cm (47 × 47 in)
- Level 2: 90 × 90 cm (35 × 35 in)
- Level 3: 60 × 60 cm (24 × 24 in)
- Level 4: 40 × 40 cm (16 × 16 in)
- Level 5: 25–30 × 25–30 cm (10–12 in)
For a simpler version (3 levels):
- 100 × 100 cm
- 70 × 70 cm
- 40 × 40 cm
Frame Height:
- ideal: 15–20 cm (6–8 inches)
- minimum: 12 cm (5 inches)
- maximum: 25 cm (10 inches)
Alternative (If You Don’t Have Circles)
You can easily use:
- square wooden frames
- cut wooden boards assembled into squares
- even recycled pallets
The key is creating stacked levels

Benefits:
saves space
looks clean and modern
Easy to maintain
strawberries stay cleaner (not touching the ground)
Tips:
- water regularly, especially in summer
- add mulch (wood chips or bark)
- make sure water drains well
- fertilize lightly every few weeks
Conclusion:
This is a simple, fast, and very satisfying project.
You can adjust the shape (round or square) and the number of levels depending on your space and materials.