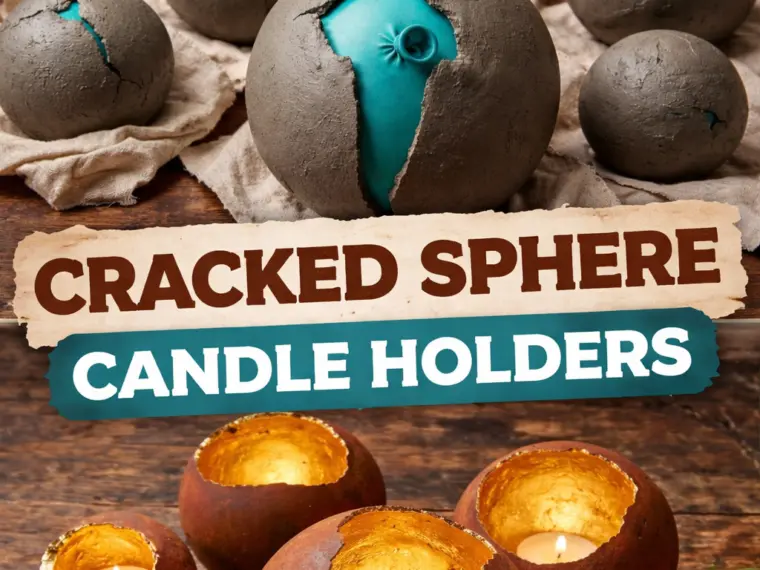
If you’re looking for a unique, eye-catching DIY project that transforms simple materials into elegant home décor, these cracked sphere candle holders are exactly what you need. With their raw, earthy exterior and glowing metallic interior, they create a warm and luxurious ambiance—perfect for cozy evenings, romantic dinners, or stylish interior accents.
This project is budget-friendly, beginner-friendly, and ideal for anyone who loves creative crafts with a high-end look.
Affiliate Disclaimer
This article contains affiliate links. This means that if you click on a link and make a purchase, I may earn a small commission at no extra cost to you. These commissions help support the content and allow me to continue creating helpful DIY guides like this one. Thank you for your support!
Why You’ll Love This DIY Project
These candle holders stand out because of their contrast:
- Rough, stone-like outer texture
- Smooth, glowing inner finish
- Organic cracked design that feels natural and artistic
They look like something you’d find in a designer home store—but you can make them yourself at a fraction of the cost.
Materials You’ll Need
Here are the basic supplies for this project:
- Balloons (any size depending on desired sphere size)
- Cement mix or plaster
- Water
- Disposable bowl and mixing tool
- Gloves
- Craft knife or scissors
- Gold leaf sheets or metallic paint
- Glue (for gold leaf)
- Sandpaper (optional)
- Tealight candles
Step-by-Step Instructions
Step 1: Prepare the Balloons
Inflate your balloons to your desired size. These will act as molds for your spheres.
Tip: Make different sizes for a more aesthetic final display.
Step 2: Mix the Cement or Plaster
In a container, mix your cement or plaster with water until you get a thick, smooth consistency—not too runny.
Step 3: Apply the Mixture
Wearing gloves, coat the balloons with the mixture:
- Spread evenly across the surface
- Leave some uneven texture for a natural look
- Avoid making it too thin (it may crack too much)
Step 4: Let It Dry
Allow the coated balloons to dry completely. This may take 24–48 hours depending on the material and climate.
Step 5: Create the Crack Effect
Once dry:
- Gently pop and remove the balloon from inside
- Carefully break or cut a section of the sphere to create the “cracked” opening
This is where the magic happens—the irregular opening gives it that artistic, broken-shell look.
Step 6: Smooth the Edges (Optional)
Use sandpaper to smooth sharp edges if needed. You can keep it rough for a rustic style or refine it for a cleaner finish.
Step 7: Add the Golden Interior
Apply glue inside the sphere and carefully place gold leaf sheets or paint the interior with metallic gold paint.
This step creates the beautiful glowing effect when the candle is lit.
Step 8: Insert the Candle
Place a tealight candle inside your finished sphere. When lit, the golden interior reflects light beautifully, creating a warm, luxurious glow.
Styling Ideas

- Place them on a wooden table for a rustic look
- Use them as centerpieces for dinners or events
- Group different sizes together for visual impact
- Add them to shelves or nightstands for cozy lighting
Safety Tips
- Always use LED tealights if unsure about heat resistance
- Never leave candles unattended
- Ensure the base is stable before lighting
Recommended Tools & Materials (Affiliate Links)
To make your project easier, here are some recommended supplies:
- Balloons for crafting: https://amzn.to/4c7mA3H
- Cement mix / plaster: https://amzn.to/4tnD3Ie
- Gold leaf kit: https://amzn.to/4dr2Bzr
- Metallic gold paint: https://amzn.to/3PS7d7X
- Tealight candles: https://amzn.to/4dsrBq5
- Craft gloves: https://amzn.to/4v81qLz
Final Thoughts
These cracked sphere candle holders are more than just a DIY project—they’re a statement piece. With minimal materials and a bit of creativity, you can create something that looks professionally designed and completely unique.
Try this project today and transform your home with a warm, glowing touch of elegance.