
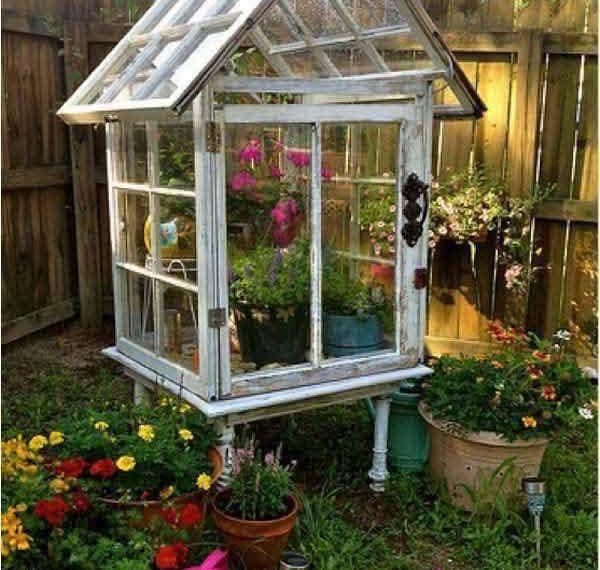
Building a DIY Greenhouse from Old Windows: A Step-by-Step Guide
A DIY greenhouse made from old windows is a sustainable and budget-friendly way to create a productive growing space in your backyard. By repurposing materials that would otherwise go to waste, you can have an eco-friendly structure that provides optimal conditions for your plants. Here’s how you can build your own greenhouse using old windows.
Materials Needed:
- Old windows (the number will depend on the size of your greenhouse)
- Pressure-treated lumber for the frame (2x4s or 2x6s)
- Hinges and screws
- Gravel or crushed stone (for the foundation)
- Clear polycarbonate sheets or plastic sheeting (optional for additional insulation)
- Roof rafters (if necessary)
- Wood screws and a drill
- Saw (for cutting lumber)
- Measuring tape
- Level
Step 1: Planning and Design
Before you begin building, consider the following factors:
- Location: Choose a sunny spot in your yard that gets adequate sunlight throughout the day.
- Size: The number of windows you have will determine the size of your greenhouse. Plan to leave enough space between the windows for ventilation and a door.
- Shape: Decide whether you want a rectangular, lean-to, or A-frame design. The most common design for old window greenhouses is a lean-to or a simple rectangular structure.
Step 2: Gather Old Windows
The key to this project is sourcing the windows. Check local thrift stores, online marketplaces, or ask neighbors and friends if they have any old windows lying around. Ideally, you want windows with frames that are in good condition. The more similar the windows are in size, the easier it will be to construct the greenhouse.
Step 3: Build the Frame
The frame provides the structure for the greenhouse. Start by laying out your pressure-treated lumber to form the base of the greenhouse. Use 2x4s or 2x6s for strength and durability.
- Foundation: For a simple foundation, dig small trenches and lay gravel or crushed stone. This helps with drainage and prevents the greenhouse from sinking into the ground over time.
- Wall Frame: Construct the frame by attaching the vertical supports (2x4s) to the base. Space them to fit the width of your windows. The vertical supports will serve as the frame for each window. Ensure everything is square and level.
- Roof Frame: Once the walls are in place, construct the roof frame. If you’re building a lean-to design, the roof will have a single slope, so you only need two roof supports. For a gable roof (A-frame), the roof will have two sloping sections that meet at the peak.
Step 4: Install the Windows
Now comes the fun part—attaching the windows!
- Window Placement: Lay the windows horizontally or vertically, depending on your design. The window frames should sit securely in the spaces between the vertical supports. If your windows don’t match perfectly, you can fill any gaps with additional framing or insulation materials.
- Attach the Windows: Use hinges to attach the windows to the top frame for ventilation. This will allow you to open and close them for airflow. Secure the windows to the bottom and sides with screws.
- Seal Gaps: If you have any gaps between the windows or the frame, you can use silicone sealant to make the greenhouse more airtight. Consider using weatherstripping for extra insulation around the window edges.
Step 5: Install the Roof and Additional Coverage
Once the walls are complete, focus on the roof. If you’re building a slanted roof, you can cover the roof with clear polycarbonate sheets, corrugated roofing material, or clear plastic sheeting.
- Plastic Sheeting: If you’re using plastic sheeting, stretch it over the frame and secure it with roofing nails or screws. Make sure it’s tightly pulled to avoid any sagging that could block sunlight.
- Polycarbonate Sheets: These are more durable and provide better insulation. Cut them to fit your roof frame, and attach them using screws and washers to ensure a watertight seal.
Step 6: Add the Door
Every greenhouse needs a door. You can either use another old window or build a simple wooden door frame from pressure-treated lumber. Attach the door with hinges and a latch.
Step 7: Final Touches
- Flooring: For the floor of your greenhouse, you can leave it as dirt or add gravel to improve drainage. Some people also use paving stones or concrete if they want a more polished look.
- Ventilation: Make sure to leave room for proper airflow. In addition to the window vents, you might want to install a small vent or fan to regulate temperature and humidity.
Step 8: Start Planting!
Now that your greenhouse is complete, it’s time to fill it with plants! Consider growing vegetables, herbs, or even flowers. Be mindful of temperature and humidity inside the greenhouse, and adjust the ventilation as needed to create the ideal growing environment.
Additional Tips for Your DIY Greenhouse:
- Insulation: In colder climates, consider adding extra insulation using bubble wrap or polycarbonate panels to retain heat.
- Rainwater Collection: Set up a rainwater collection system using gutters and downspouts to keep your plants watered sustainably.
- Storage: Include some shelves or hooks for storing gardening tools or supplies.
Benefits of Building a Greenhouse from Old Windows:
- Cost-effective: Using recycled windows makes this project affordable, especially if you can source windows for free.
- Eco-friendly: You’re repurposing materials that would otherwise go to a landfill, making this project environmentally friendly.
- Personalized design: You can customize the size, shape, and style of the greenhouse to fit your yard and gardening needs.
Conclusion
Building a greenhouse from old windows is a great way to recycle materials and create a functional, beautiful structure in your garden. It allows you to grow plants year-round, extend your growing season, and save money on store-bought greenhouses. With a little creativity and elbow grease, you’ll have your own sustainable greenhouse in no time!


