
Build a Backyard Fire Pit from the Ground Up: Your Cozy Outdoor Centerpiece 🔥🏡✨
There’s something timeless about gathering around a fire. The warmth, the soft crackle of burning wood, and the golden glow against the evening sky create a natural place for connection. A backyard fire pit — thoughtfully built from the ground up — can transform an ordinary outdoor space into a welcoming retreat.
If you’re considering building one, here’s a complete guide to designing, constructing, and styling a durable, beautiful fire pit that becomes the heart of your outdoor living area.
Why Build a Fire Pit?
A well-built fire pit offers:
- A natural gathering space for family and friends
- Extended use of your backyard during cooler months
- A cozy atmosphere for conversations and relaxation
- A visual focal point that enhances landscaping
Unlike portable fire bowls, a built-in fire pit feels permanent, intentional, and architecturally integrated into your yard.
Step 1: Planning and Location
Before digging, choose the right spot.
Consider:
- At least 10–20 feet away from structures or fences
- Away from low-hanging branches
- On level ground
- In an area protected from strong winds
- With good drainage
Check local regulations and HOA rules regarding open flames.
A square or circular design works beautifully, but a square pit often complements modern patios and clean landscaping lines.
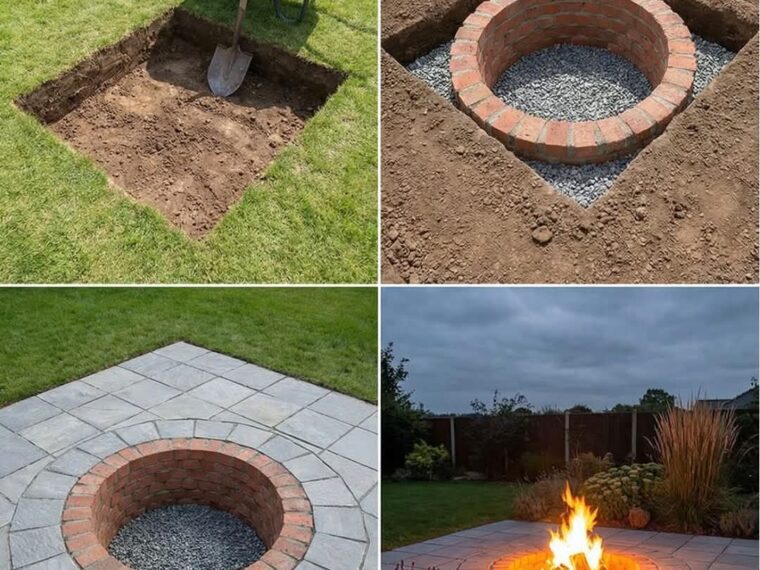
Step 2: Digging the Foundation
Start by marking your fire pit dimensions. A common size is:
- 36–44 inches wide
- 12–18 inches deep
Dig a square hole with straight edges and a flat bottom. This foundation ensures structural stability and prevents shifting over time.
Remove all roots and loose soil.
Step 3: Create a Stable Base with Gravel
Fill the bottom with 3–4 inches of crushed gravel.
Why gravel matters:
- Promotes drainage
- Prevents water pooling
- Reduces freeze-thaw damage
- Adds structural stability
Compact the gravel firmly using a tamper to create a solid base.
Step 4: Lining with Brick
Next, line the interior walls with fire-rated bricks or firebricks.
Important tips:
- Use heat-resistant materials only
- Avoid standard concrete blocks inside the burn area
- Stack evenly and check for level alignment
Firebricks withstand high temperatures and prevent cracking or structural damage.
You can dry-stack for a rustic look or use heat-resistant mortar for a more permanent structure.
Step 5: Add the Outer Stone Finish
Once the inner structure is secure, finish the exterior with natural stone, pavers, or decorative blocks.
This step:
- Enhances visual appeal
- Reinforces stability
- Matches your patio style
Choose stone tones that complement your home’s exterior or landscape design.
Step 6: Install a Stone Patio Surround
A clean stone patio surround elevates the project from simple fire pit to true outdoor centerpiece.
Benefits of a stone surround:
- Creates seating space
- Defines the gathering area
- Protects grass from foot traffic
- Adds a polished, finished look
Lay a level base of compacted gravel and sand before placing pavers or stone slabs. Ensure tight joints and a stable surface.
Step 7: Final Touches
Complete the space with:
- Outdoor chairs or built-in seating
- String lights or lanterns
- A wood storage rack
- Weather-resistant cushions
- A spark screen for safety
Consider adding a removable grill grate if you’d like occasional outdoor cooking.
Safety Essentials
Always prioritize safety:
- Keep a bucket of water or hose nearby
- Never leave fires unattended
- Burn only dry, seasoned wood
- Avoid treated or painted wood
- Allow ashes to cool fully before disposal
If your region experiences drought conditions, follow local fire restrictions.
The Atmosphere It Creates
As evening falls and the flames flicker to life, the fire pit becomes more than a structure — it becomes an experience.
It’s where:
- Stories are shared
- Marshmallows are roasted
- Quiet conversations unfold
- Stress melts away with the warmth
The clean stone surround frames the glow beautifully, turning your backyard into a peaceful retreat.
Long-Term Maintenance
To keep your fire pit in top shape:
- Remove ashes regularly
- Check bricks annually for cracks
- Reseal stone if needed
- Keep drainage clear
With proper care, a well-built fire pit can last for decades.
Final Thoughts
Building a backyard fire pit from the ground up — starting with a carefully dug square, stabilized with gravel, lined with brick, and finished with a refined stone patio surround — creates more than just a functional feature.
It becomes the heart of your outdoor space.
Warm, inviting, and timeless, it’s where memories are made — one cozy evening at a time. 🔥✨


