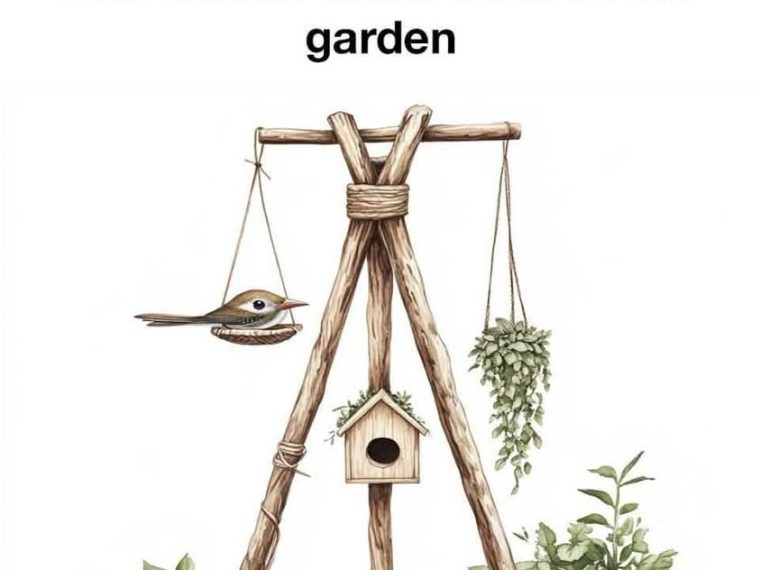
Creating a bird-friendly habitat in your garden is a rewarding and enjoyable way to engage with nature while providing a sanctuary for local wildlife. One innovative way to attract small birds to your garden is by building a habitat tripod. This simple yet effective structure serves multiple purposes: it provides shelter, a feeding station, and even a place for nesting. By building this versatile tripod, you can create a comfortable and secure environment for birds to thrive in your garden.
This guide will walk you through the process of building a habitat tripod, from gathering materials to setting it up in your garden. Along the way, we’ll also discuss how you can make it attractive to small birds and ensure it meets their needs for food, water, and shelter.
Why Build a Habitat Tripod for Birds?
Before diving into the construction process, let’s take a moment to understand why a habitat tripod is such a great addition to your garden:
- Shelter: Small birds, especially those in urban or suburban areas, often struggle to find safe spaces to perch, rest, or hide from predators. A tripod provides an elevated platform where birds can take refuge from predators like cats and squirrels.
- Feeding Station: The tripod can be equipped with bird feeders, offering a steady supply of food such as seeds, berries, and suet, attracting a variety of bird species to your garden.
- Nesting Site: Birds need places to nest and lay eggs. By integrating nesting platforms or hanging baskets, you can provide birds with a safe and secure spot to raise their young.
- Sustainability: Building a tripod structure with natural or recycled materials promotes sustainability and eco-friendliness, aligning with the natural environment.
- Educational Opportunity: Setting up a tripod in your garden allows you to observe birds up close, learn more about their behavior, and create a habitat that supports local biodiversity.
Materials You’ll Need
Building a habitat tripod requires just a few basic materials. Here’s a list of what you’ll need to get started:
1. Wood (for the Tripod Legs)
- 3 long wooden poles or sturdy branches (approximately 6-8 feet in length). Opt for treated wood or branches that are resistant to weathering. Pine, cedar, or fir are good options.
2. Crossbeam or Platform
- A sturdy piece of wood or plywood (about 2 feet in length). This will serve as the platform where the bird feeders, nesting boxes, or other accessories will be attached.
3. Nails or Screws
- Strong screws or nails to secure the crossbeam to the tripod legs and to attach various accessories like bird feeders or nesting boxes.
4. Drill
- To create holes for the screws or nails.
5. Saw (if wood needs cutting)
- A saw to trim the wooden poles or crossbeam to the correct length.
6. Rope or Twine
- This is for securing the tripod structure in place, especially if you are placing it on soft ground or need additional support.
7. Bird Feeders and Accessories
- You can use purchased or homemade bird feeders such as tube feeders, platform feeders, suet cages, or even a simple dish for seeds.
- You can also add small birdhouses, nesting baskets, or plant pots as nesting sites.
8. Optional – Hooks or Hanging Equipment
- If you plan to hang birdhouses, suet cages, or other accessories, you’ll need hooks or hanging hardware.
9. Paint (optional)
- If you want to decorate your tripod to make it blend with your garden or to protect it from the elements, you can use non-toxic outdoor paint.
10. Post or Stake (for stabilization)
- This can be used to secure the tripod into the ground, particularly if you have soft soil or windy conditions.
Step-by-Step Guide to Building a Habitat Tripod
Step 1: Preparing the Wood
Start by preparing the wooden poles. You’ll need three sturdy poles or branches that are each about 6 to 8 feet long. If they are too long or too short for your garden space, use a saw to trim them to the desired length.
- Tip: Make sure the wood is free from rot and damage. Freshly cut branches or well-treated wood are ideal.
Step 2: Shaping the Tripod Legs
Lay the three poles side by side, ensuring they are approximately the same length. This will be the base of the tripod structure.
- Assembly: Position the poles so that they are evenly spaced in a triangular shape. The three poles should form a strong, stable tripod. You may want to attach the tops of the poles with a temporary rope or tie to hold them in place while you secure the legs.
Step 3: Attaching the Crossbeam
Once you have the tripod shape, it’s time to add the crossbeam or platform that will hold the bird feeders.
- Placement: Secure the crossbeam about 3 to 4 feet above the ground. This height is ideal for attracting small birds, as they feel safer off the ground.
- Attachment: Use screws or nails to attach the crossbeam to the tripod legs. You can either drill holes through the top of each leg and into the crossbeam or attach the crossbeam directly to the inside of the legs for added stability.
Step 4: Stabilizing the Structure
To ensure your tripod remains upright and stable, you may need to add additional support.
- Post or Stake: Drive a sturdy post or stake into the ground near the base of the tripod. Attach the legs of the tripod to this post using ropes or twine. This will help prevent the tripod from tipping over in strong winds.
- Optional Weight: If necessary, you can add some weight to the base of the tripod (such as stones or bricks) to keep it grounded.
Step 5: Adding Bird Feeders and Accessories
Once the tripod structure is in place, it’s time to add your bird feeders and any other accessories.
- Feeding Station: You can attach a variety of bird feeders to the crossbeam. A tube feeder, platform feeder, or hanging dish for seeds are all great options. Ensure the feeders are securely attached to avoid them falling off.
- Nesting Site: If you want to provide a nesting site for birds, hang a small birdhouse or place a nesting basket on the tripod. Choose a birdhouse designed for small birds like chickadees or finches.
- Suet Cages: If you live in an area where woodpeckers are common, adding a suet cage to the tripod can provide an extra food source.
Step 6: Positioning the Tripod in Your Garden
Now that your tripod is complete, it’s time to place it in a location where birds will feel safe and comfortable. Look for an area that is:
- Partially shaded: This provides birds with relief from the sun during the hotter months.
- Near bushes or shrubs: These act as natural shelter and protection for birds in case of predators.
- Away from busy traffic areas: Birds are easily startled, so choose a quiet spot in your garden.
Step 7: Final Adjustments and Decor
Once the tripod is in place, make any final adjustments to ensure stability. You can also decorate the tripod by adding plants or flowers around the base to make it blend with the natural surroundings of your garden.
- Optional Paint: If you want your tripod to stand out or match the aesthetics of your garden, you can paint it with non-toxic outdoor paint. Use earthy tones like greens or browns to make it look more natural.
How to Attract Small Birds to Your Habitat Tripod
Now that your tripod is built, it’s time to make it appealing to small birds. Here are some tips to attract a variety of birds:
- Choose the Right Feed: Different birds prefer different types of food. Offer a variety of seeds, such as sunflower seeds, millet, or thistle, to attract a wider range of birds.
- Provide Fresh Water: Birds need access to fresh water for drinking and bathing. You can place a shallow dish of water on the tripod or nearby in your garden. Make sure to clean the water regularly to prevent the growth of bacteria.
- Offer Natural Shelter: Planting native plants, shrubs, and trees around the tripod will provide birds with natural shelter and nesting spots.
- Keep the Area Safe: Ensure the area is safe from predators like cats and squirrels. If possible, place the tripod in an area that’s hard for these animals to access.
Maintaining Your Habitat Tripod
To keep your habitat tripod in top condition:
- Refill Feeders Regularly: Birds depend on a consistent source of food, so be sure to refill your bird feeders frequently.
- Clean the Feeders: Clean the feeders every few weeks to prevent mold buildup and keep the birds healthy.
- Monitor for Pests: Occasionally check the tripod for pests like ants or rodents. If necessary, take steps to address the issue without harming the birds.
Conclusion
Building a habitat tripod is an excellent way to create a safe, functional, and inviting space for small birds in your garden. By following this step-by-step guide, you can craft a structure that provides food, shelter, and a nesting site for local bird species. Not only will your garden become a haven for birds, but you’ll also have the joy of watching them thrive right in front of you.
With a little time and
effort, you’ll have a bird-friendly garden that adds beauty, biodiversity, and peaceful moments of wildlife observation to your outdoor space.