For many gardeners, the frustration of battling harsh winters or scorching summers can make year-round growing seem impossible.
Frost kills delicate crops, while heat wilts your hard work. The struggle to maintain a garden in fluctuating climates leaves many searching for a solution.
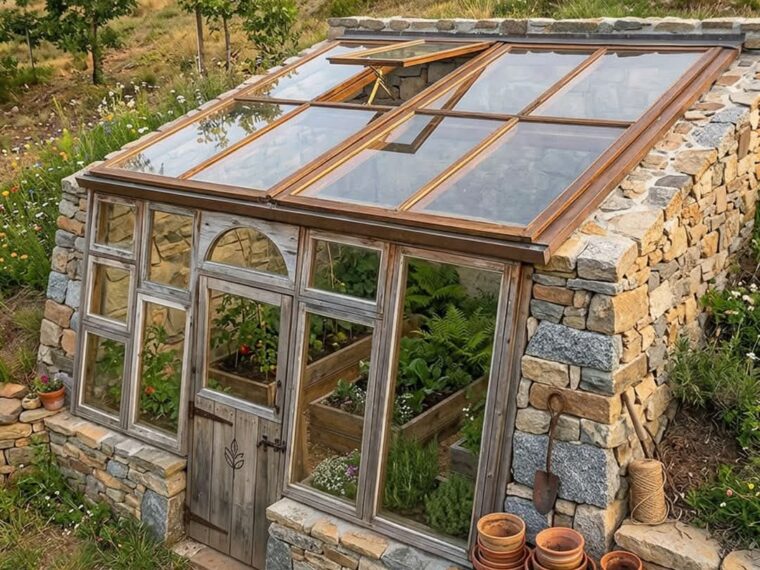
Enter the Walipini greenhouse, an underground haven that shields your plants from extreme weather, allowing you to grow fresh produce all year long. With its clever design and natural insulation, it’s the ultimate answer to your gardening challenges.
Why Should We Build a Walipini Greenhouse?
A Walipini greenhouse’s underground design shields crops from extreme temperatures, staying warm in winter and cool in summer. This natural insulation also makes the Walipini energy efficient, reducing the need for heating or cooling systems.

With locally sourced materials and simple construction, it’s a cost-effective alternative to traditional greenhouses.
Once built, it requires minimal maintenance, withstanding wind, snow, and rain. Its resilience makes it perfect for areas with challenging climates.
Planning Your Walipini Greenhouse
Choosing the Right Location
The long side of the Walipini should face north (in the northern hemisphere) to maximize sunlight. This orientation ensures that the greenhouse absorbs the most heat during the day, which is critical for maintaining a stable internal temperature.
Also, you need to choose a location with well-draining soil to prevent waterlogging. A natural slope is beneficial, as it can aid drainage and make the structure easier to build. Be mindful of nearby trees or structures that might cast shadows.
Determining the Size and Depth
For a family garden, a Walipini that’s 10 feet wide and 20 feet long is a good starting point, but you can adjust the dimensions depending on your needs.
You also need to notice that a depth of at least 6 feet will keep the temperature inside the greenhouse stable, even during cold winter months.
Materials Needed
You need to prepare:
- Excavation tools: shovels, pickaxes.
- Retaining wall materials: Concrete blocks, bricks, or large stones.
- Roofing: greenhouse plastic, polycarbonate panels, or glass.
- Structural supports: Wood or metal beams.
Step-by-Step Guide on Building Your Walipini Greenhouse
Step 1: Excavation
You’ll need to excavate the soil to a depth of around 6 to 8 feet, depending on your climate and growing needs. As you dig, ensure that the floor is level to allow for proper drainage.
Make sure to slope the back wall higher than the front, this will create the angle needed for the sloped roof, which is essential for maximizing sunlight and ensuring proper temperature regulation inside.

Step 2: Building the Retaining Walls
Lay concrete blocks, bricks, or large stones carefully to create walls that are sturdy enough to hold back the pressure from the surrounding earth.
For additional insulation, you can add a layer of straw bales or earthbags between the walls and the surrounding soil to protect your plants from outside temperature fluctuations.

Step 3: Constructing the Roof Frame
The roof should be slanted at an angle of about 35 to 45 degrees to capture as much sunlight as possible, especially during the colder months.
You can use wooden or metal beams for the frame, making sure they are sturdy and spaced evenly across the structure to support the weight of the roofing material.

Step 4: Installing the Transparent Roof
TO CONTINUE READING THE ARTICLE PLEASE SEE PAGE 2 👇