How to Build a Walipini Greenhouse for Year-Round Food Production
A Walipini greenhouse is an underground or semi-underground greenhouse that harnesses the earth’s natural insulation to create a stable environment for growing food year-round. Originally developed in the Andes, “Walipini” means “place of warmth” in the Aymara language. This design is cost-effective, energy-efficient, and well-suited for cold climates.
Benefits of a Walipini Greenhouse
- Year-Round Growing: Maintains a stable temperature using geothermal heat.
- Energy Efficiency: Reduces heating and cooling costs by using the earth’s natural insulation.
- Protection from Weather: Shields plants from extreme cold, wind, and hail.
- Water Conservation: Retains moisture better than above-ground greenhouses.
Step-by-Step Guide to Building a Walipini Greenhouse
1. Choose the Right Location
Selecting an appropriate site is crucial for maximizing sunlight and stability. Consider:
- Sunlight Exposure: The greenhouse should face true south (Northern Hemisphere) or true north (Southern Hemisphere) for maximum solar gain.
- Drainage: Avoid areas prone to flooding. A slight slope helps with water runoff.
- Soil Type: Sandy or loamy soil is best for drainage; avoid heavy clay.
- Wind Protection: Natural wind barriers like hills or trees can improve energy efficiency.
2. Plan the Dimensions
- A typical Walipini is 6-8 feet (1.8-2.4 m) deep and at least 10-20 feet (3-6 m) wide.
- Length depends on your needs, but 20-30 feet (6-9 m) is common.
- The roof should be angled at 35-45 degrees to optimize sunlight capture, depending on your latitude.
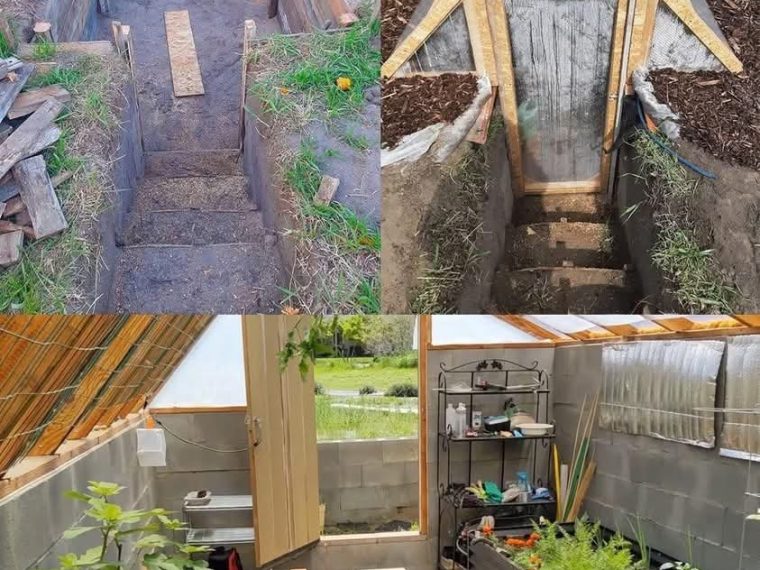
3. Excavate the Site
- Dig to the desired depth, ensuring the floor is level.
- The north wall should be taller than the south wall to support the slanted roof.
- If the site has poor drainage, dig trenches or install a French drain system.
4. Build the Retaining Walls
- Use rammed earth, stone, brick, or concrete blocks to reinforce the walls and prevent collapse.
- For additional insulation, use straw bales or double-layered walls filled with soil.
5. Install Roof Supports
- Use wooden beams, metal poles, or PVC pipes to create a sturdy frame.
- The transparent roof material (polycarbonate, greenhouse plastic, or glass) should be angled toward the sun.
- Ensure the structure is strong enough to withstand snow and wind loads.
6. Insulate and Ventilate
- North Wall Insulation: Use thermal mass materials like stone, brick, or water barrels to store heat.
- Roof Ventilation: Install vents or operable windows to release excess heat in summer.
- Side Ventilation: Add adjustable vents or pipes for airflow.
7. Install Doors and Flooring
- Use an insulated door to maintain warmth.
- Floor options: Compacted soil, gravel, brick, or stone for drainage.
8. Add Irrigation and Raised Beds
- Drip irrigation conserves water and prevents soil erosion.
- Raised beds improve drainage and prevent soil compaction.
Maintaining Your Walipini Greenhouse
- Monitor Temperature: Use a thermometer to track heat levels.
- Manage Humidity: Ventilation prevents mold and mildew.
- Seasonal Adjustments: Add shade cloth in summer and extra insulation in winter.
- Soil Health: Rotate crops, add compost, and test soil regularly.
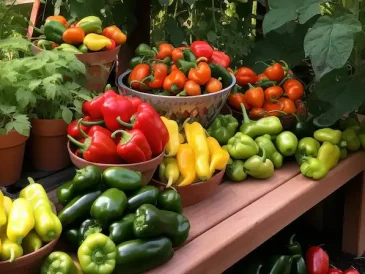
Best Crops for a Walipini
- Winter: Kale, spinach, carrots, beets, onions, garlic.
- Spring/Summer: Tomatoes, peppers, cucumbers, herbs, melons.
- Perennials: Strawberries, asparagus, fruit trees in pots.
Final Thoughts
A Walipini greenhouse is an excellent investment for sustainable, year-round food production. While the initial construction requires effort, the long-term benefits include lower energy costs, extended growing seasons, and increased food security. By carefully planning and maintaining your underground greenhouse, you can enjoy fresh produce even in harsh winters.
Would you like more details on specific aspects, such as construction materials or alternative designs?