🥦 Smart Broccoli Tree Painting – Step-by-Step Guide
🎨 What You’ll Need
- 1 fresh broccoli head
- Acrylic or washable paint (green + brown + optional fall colors)
- White paper or canvas
- Paintbrush
- Paper plate (for paint)
- Cup of water + paper towels
✂ Step 1: Prepare the Broccoli
- Cut the broccoli head in half (through the stem).
- You’ll see a beautiful natural “tree top” shape.
- Pat it dry with paper towel so paint sticks well.
👉 The cut side will be your stamp.
🌳 Step 2: Paint the Tree Trunk
- Use a brush and brown paint.
- Draw a simple vertical trunk.
- Add small branches at the top.
Let it dry for 2–3 minutes before stamping.
🌿 Step 3: Add Paint to the Broccoli
- Pour green paint onto a plate.
- Dip the cut side of the broccoli into the paint.
- Make sure it’s evenly coated but not dripping.
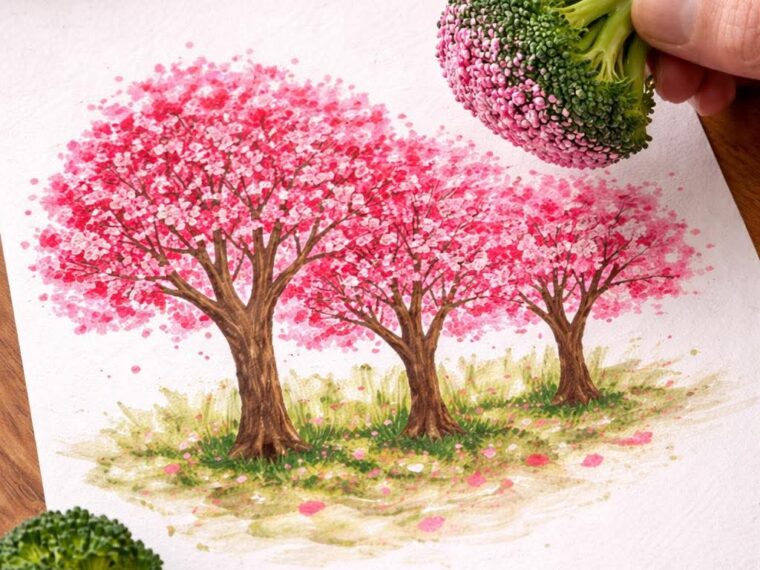
🖐 Step 4: Stamp the Tree Leaves
- Press the broccoli gently above the trunk.
- Lift straight up to reveal the leafy top.
- Re-dip and stamp again to make the tree fuller.
✨ Tip: Use different shades of green for depth.
🍂 Step 5 (Optional): Make Seasonal Trees
You can turn this into different themed artwork:
- 🍁 Fall tree – use red, orange, yellow
- ❄ Winter tree – use white paint for snow
- 🌸 Spring tree – add pink dots for blossoms
- 🌈 Fantasy tree – use purple or blue!
💡 Make It “Smart”
Turn this into a learning activity:
- Teach kids about tree structure (trunk, branches, leaves).
- Count how many stamps they used.
- Talk about seasons and nature.
- Practice fine motor skills.
🧼 Easy Clean-Up
- Wash broccoli immediately if reusing for another color.
- Use washable paint for younger kids.
- Cover the table with newspaper.
❤️ Why This Activity Is Great
- Encourages creativity
- Eco-friendly (using real vegetables)
- Budget-friendly
- Sensory learning experience