Lavender (Lavandula) is the crown jewel of the aromatic garden. Known for its silvery foliage, striking purple spires, and a scent that has defined relaxation for centuries, it is a staple for any gardener looking to add structure and sensory appeal to their landscape.
However, lavender is a woody perennial, meaning it can become leggy or “woody” after a few years.
Propagating lavender in May is the most strategic way to rejuvenate your garden, fill in gaps for free, or create a stunning, uniform hedge.
May provides the perfect “Goldilocks” window: the parent plants are surging with growth hormones, but the intense, dehydrating heat of summer hasn’t yet arrived.
This guide details the professional-grade techniques for softwood propagation, ensuring you achieve a high success rate and a garden brimming with fragrance.
The Science of May Propagation: Why Softwood Cuttings Work
Lavender can be grown from seed, but this is a slow, erratic process that rarely produces plants identical to the parent. For a fuller, blooming garden, vegetative propagation (taking cuttings) is the standard.
In May, lavender produces “softwood” growth. This is the new, flexible, non-woody material at the tips of the stems.
Softwood cuttings have the highest concentration of auxins – natural plant hormones that stimulate root development.
By taking cuttings now, you take advantage of the plant’s natural spring momentum, allowing roots to establish before the plant enters its flowering peak.
Selecting Your Lavender Variety
Before you snip, identify which lavender you are working with, as this determines the speed of your results:
- English Lavender (L. angustifolia): The hardiest and most fragrant. It takes slightly longer to root but produces the most iconic blooms.
- French/Spanish Lavender (L. stoechas): Known for the “rabbit ear” bracts. It roots very quickly but is less cold-tolerant.
- Lavandin (L. x intermedia): A hybrid that is larger and more vigorous. These make the best hedges.
Essential Tools for Success
To ensure your cuttings don’t succumb to rot or desiccation, you need the right kit:
- A Sharp, Sterilized Blade: Use a floral knife or a sharp pair of bypass pruners. Dull blades crush the stem tissue, making it harder for roots to emerge.
- Propagation Tray or Small Pots: Use deep trays with excellent drainage.
- Professional Seed-Starting Mix: Avoid standard garden soil. Use a 50/50 mix of perlite or sharp sand and peat-free compost. Lavender roots require high oxygen levels; a heavy soil will suffocate them.
- Rooting Hormone (Optional): While lavender roots well on its own, a quick dip in rooting powder or gel can accelerate the process.
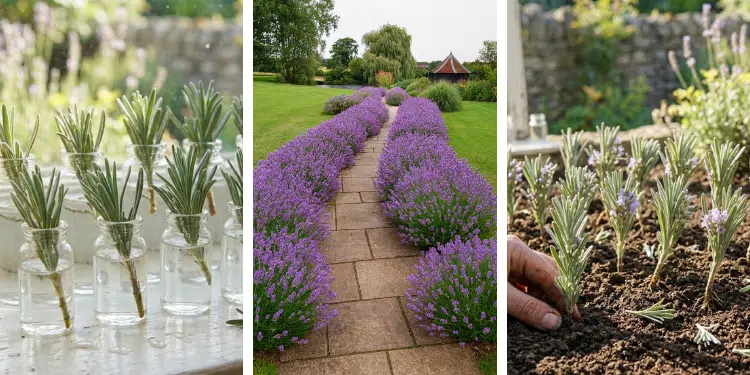
Step-By-Step Guide to Taking Softwood Cuttings
1. Timing the Harvest
The best time to take your cuttings is early morning. Overnight, the plant rehydrates its tissues.
A stem harvested at 7:00 AM is turgid (full of water), whereas a stem harvested at 2:00 PM is already stressed by the sun, significantly lowering its survival rate.
2. Identifying the Ideal Stem
Look for vigorous, side-shoots that do not have flower buds. A stem trying to produce a flower is diverting its energy away from root production.
Choose a stem that is approximately 3 to 4 inches long, ensuring it is green and flexible, not brown and woody at the base.
3. The Precision Cut
Make a clean, horizontal cut just below a leaf node (the bump where leaves emerge). This area contains the highest density of undifferentiated cells that can be “reprogrammed” to become roots.
4. Stripping and Preparing
Remove the leaves from the bottom two inches of the cutting. You want a bare stem to insert into the soil.
Be careful not to tear the “skin” of the stem. If you are using rooting hormone, dip the bottom half-inch into the medium now.
Potting and Aftercare: The First 30 Days
Insertion
Use a pencil or “dibber” to make a hole in your potting mix. Do not simply push the lavender stem in, as this can rub off the rooting hormone or damage the delicate stem tip.
Insert the cutting so the lowest remaining leaves are just above the soil line. Firm the soil gently to remove air pockets.
The Micro-Climate
Lavender cuttings do not like to be “misted” excessively, as they are prone to fungal issues. However, they need humidity.
Place your tray in a bright spot, out of direct sunlight, and cover with a clear plastic dome or a simple plastic bag supported by stakes.
Bottom Heat
If your garage or greenhouse is still cool in May, using a heat mat set to 21°C (70°F) can cut rooting time in half. Warm soil and cool air are the “magic formula” for root development.
Troubleshooting Common Issues
| Problem | Cause | Solution |
| Wilting | Excessive transpiration / lack of humidity | Check the plastic cover; ensure it’s sealed. |
| Yellowing Base | Overwatering / poor drainage | Reduce watering; increase perlite in the mix. |
| Mold/Botrytis | Stagnant air | Remove the cover for 1 hour daily to provide fresh air. |
When to Pot On and Plant Out
In 4 to 6 weeks, gently tug on a cutting. If you feel resistance, roots have formed. At this stage, remove the plastic cover entirely to “harden off” the plants.
By late May or early June, your new lavender plants can be moved into individual 4-inch pots. Keep them in these pots for the summer, allowing them to build a robust root ball.
You can plant them in their permanent garden positions in early autumn. By next May, you will have established, blooming plants that cost you nothing but a few minutes of your time.
Strategic Planting for a “Fuller” Garden
To achieve that professional “English Garden” look:
- Hedge Spacing: Plant your new lavender 12 inches apart. This allows the plants to grow into each other, creating a seamless silver-and-purple ribbon.
- The Sunny Spot: Lavender requires a minimum of 6 to 8 hours of direct sun. In May, observe your garden’s light patterns before deciding where to plant your new starts.
- Drainage is Non-Negotiable: If you have heavy clay soil, plant your lavender in “mounds” or raised beds to ensure water drains away from the crown.
By mastering the art of May propagation, you aren’t just growing more plants; you are ensuring the longevity and vibrance of your garden’s ecosystem for years to come.