You won’t believe these came from a kitchen. Sparkling, colorful, glittery little rocks that look like they were pulled straight from a pirate’s treasure chest — and they’re made with nothing more than baking soda, water, food coloring, and a pinch of glitter. Magic Treasure Rocks are one of those activities that seems almost too simple to be this impressive, yet the results are genuinely stunning every single time.
Parents who’ve tried this report the same thing: kids go completely wide-eyed when the rocks start coming together. The colors swirl, the glitter catches the light, and suddenly a bowl of baking soda paste has transformed into something that looks like it belongs in a jewelry store — or at the bottom of the ocean.
If you’re looking for an activity that’s fast to set up, uses pantry ingredients, and keeps kids engaged from start to finish, Magic Treasure Rocks deserve a permanent spot in your rotation. Here’s everything you need to know.
What Are Magic Treasure Rocks?
Magic Treasure Rocks are homemade gem-like objects made from a simple baking soda and water mixture, tinted with food coloring and loaded with glitter. When shaped by hand and left to dry, they harden into smooth, shiny little rocks that genuinely look like polished gemstones or exotic minerals.
They’re part sensory activity, part art project, part science experiment — and fully magical. Kids love shaping them, choosing color combinations, watching them dry and transform, and then collecting and displaying them like real treasures.
Unlike store-bought slime kits or craft sets, these require no special supplies and no advance planning. Everything you need is probably already in your home right now.
What You’ll Need
The ingredient list is refreshingly short:
- 1 cup baking soda — The foundation of the whole recipe. Baking soda gives the rocks their smooth, workable texture and hardens beautifully as it dries.
- ¼ cup water — Just enough to bring the baking soda together into a moldable paste.
- Food coloring — In as many colors as you like. The bolder and more saturated, the better the final rocks will look.
- Glitter — Fine glitter works best and distributes most evenly through the mixture. Any color goes — gold and silver give a particularly treasure-like effect.
Optional add-ins that take things to the next level: iridescent glitter, metallic food coloring, a drop of essential oil for scent, or small plastic gems pressed into the surface before drying.
Step-by-Step Instructions
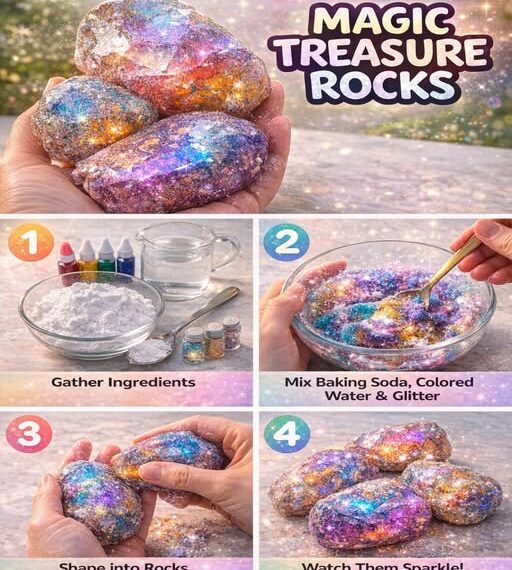
Step 1: Mix Baking Soda and Water
Pour one cup of baking soda into a mixing bowl. Slowly add the water, a little at a time, stirring as you go. You’re looking for a consistency similar to thick dough or firm clay — moldable and holdable, but not crumbly or wet.
Stir thoroughly until the mixture is completely smooth with no lumps. This is your base, and getting it right is the key to rocks that hold their shape well. If it feels too dry and crumbles, add water a few drops at a time. If it feels too wet and sticky, add a small pinch more baking soda.
Step 2: Add Colors and Glitter
Now comes the most fun part of the whole process. Divide your base mixture into separate portions — one for each color you want to make. Drop several drops of food coloring into each portion and knead or stir until the color is fully and evenly mixed in. The more drops you use, the deeper and more vibrant the color will be.
Once the color is incorporated, add your glitter. A generous pinch per portion gives a beautiful sparkle effect throughout the rock. Stir or knead again to distribute the glitter evenly.
This is a wonderful moment to let kids take over completely. Let them choose their own colors, decide how much glitter to add, and even experiment with swirling two colors together for a marbled effect.
Step 3: Shape Into Small Rocks
Take a small amount of the colored mixture — roughly the size of a large marble or a small egg — and press it between your palms. Roll it, press it, pinch it, and shape it into whatever feels like a rock to you. Some kids love smooth, round shapes. Others go for jagged, irregular forms that look more like raw gemstones. Both are great.
You can also press a thumbprint into the surface for texture, use a small butter knife to create facets like a cut gem, or press a plastic jewel or bead into the surface for extra detail.
Work relatively quickly, as the mixture will begin to dry and become harder to shape the longer it sits out.
Step 4: Let Them Dry and Shine
Arrange your finished rocks on a baking sheet lined with parchment paper, a plate, or any flat surface where they won’t be disturbed. Leave them to air dry — this usually takes anywhere from 24 to 48 hours depending on the size of the rocks and the humidity in your environment.
As they dry, something wonderful happens: the surface of each rock becomes smooth and slightly glossy, the colors deepen, and the glitter catches the light in a way that makes them look genuinely gem-like. Kids who check on them throughout the drying process get to watch the transformation in real time, which is its own kind of magic.
For faster results, you can place the rocks in an oven on the lowest possible setting (around 170°F / 75°C) for about an hour. This speeds up drying without burning or cracking them.
Once fully dry, the rocks are solid, smooth, and beautiful — ready to be collected, displayed, gifted, or used in imaginative play.
The Science Behind the Magic
Magic Treasure Rocks aren’t just pretty — they’re a wonderful hands-on introduction to some real chemistry and materials science.
Why Baking Soda Works So Well
Baking soda (sodium bicarbonate) is a fine, crystalline powder that, when mixed with just the right amount of water, forms a workable paste. As the water evaporates during drying, the baking soda crystals pack tightly together and the structure hardens — similar in principle to how cement sets, though through a much gentler process.
The result is a solid that’s smooth, slightly chalky in texture, and firm enough to hold its shape permanently. That transformation from wet paste to hardened rock is genuinely fascinating to observe.
What Makes Them Shiny
The shine comes from two sources: the glitter particles embedded throughout the mixture, and the slightly crystalline surface that forms as the baking soda dries. Under light, the surface catches and scatters light in a way that mimics the natural luster of polished minerals. Add fine glitter and the effect is amplified dramatically.
A Gateway to Earth Science
Magic Treasure Rocks open a natural door to conversations about real gemstones and minerals. How do real gems form? What makes a diamond different from quartz? How do geologists identify minerals? Kids who’ve made their own “gems” are often far more curious about the real thing — and those conversations can lead to library books, museum visits, and a genuine love of earth science.
Why Kids Are So Obsessed With This Activity
The Transformation Is Thrilling
Children are wired to love transformation — watching something change from one state to another. The journey from a bowl of white powder to a glittering, colorful gem hits that instinct perfectly. There’s a before and an after, and the after is genuinely beautiful.
It Taps Into the Universal Love of Treasure
Ask almost any child what they’d find at the end of a rainbow or buried in a pirate chest, and they’ll describe something that looks a lot like these rocks: colorful, shiny, precious-looking. Making their own “gems” taps directly into that imaginative world and makes the fantasy tangible.
It’s Hands-On From Start to Finish
Every step involves touching, shaping, and creating. There’s no waiting while a grown-up does the interesting part — kids are active participants from the moment the water hits the baking soda. That sense of ownership and authorship makes the finished rocks feel genuinely meaningful.
It Produces Something to Keep
Unlike many activities that produce nothing lasting, Magic Treasure Rocks result in beautiful objects kids can keep forever. They can display them on a shelf, arrange them in a box, give them as gifts, or use them as props in imaginative play for weeks and months to come. That permanence adds real value to the experience.
Sensory Satisfaction
The texture of the baking soda mixture is deeply satisfying to handle — smooth, cool, and responsive. Shaping and squishing the paste engages the sensory system in a calming, organizing way. Kids who love sensory play will be completely in their element.
Tips for Making the Best Magic Treasure Rocks
Nail the consistency first. Before you add any color or glitter, make sure your base mixture is the right texture. It should hold its shape when you roll it in your palms without sticking to your hands. A few test-rolls before adding the fun stuff will save you from crumbly or sticky results.
Go bold with color. Light, pastel colors tend to look washed out once the rocks dry. Use plenty of food coloring — far more than you think you need — for vivid, jewel-toned results.
Try marbling. Instead of mixing two colors together completely, swirl them just enough to create a marbled effect. Rocks with two or three colors spiraling through them look stunning.
Use fine glitter for the best results. Chunky glitter can make the mixture harder to work with and tends to clump. Ultra-fine glitter distributes beautifully and gives a more realistic gemstone sparkle.
Work on a nonstick surface. A silicone baking mat or sheet of parchment paper makes cleanup much easier and prevents the mixture from sticking to the table.
Make them in different sizes. A collection of rocks ranging from tiny pebbles to egg-sized gems looks amazing displayed together — like a real mineral collection.
Creative Variations to Try
Galaxy Rocks: Mix dark blue, purple, and black with silver and holographic glitter for rocks that look like they came from outer space.
Geode Rocks: Press the center of each rock inward with your thumb to create a hollow, then fill it with extra glitter or tiny craft gems before drying for a geode effect.
Glow-in-the-Dark Rocks: Add glow-in-the-dark powder or paint to the mixture for rocks that emit an eerie, magical glow when the lights go out.
Scented Rocks: Add a drop of lavender, peppermint, or citrus essential oil for rocks that smell as beautiful as they look.
Themed Color Palettes: Match your rocks to a theme — ocean blues and greens, fiery reds and oranges, enchanted forest greens and purples, or a pastel spring collection.
Treasure Hunt: Once the rocks are dry, hide them around the house or garden and send kids on a treasure hunt to find them all. Map-drawing optional but highly encouraged.
How to Display and Store Your Treasure Rocks
Part of what makes these rocks so satisfying is showing them off. Here are a few great display ideas:
A small wooden box or jewelry box lined with fabric makes a perfect treasure chest. A glass jar or apothecary bottle filled with the rocks looks beautiful on a windowsill. A shallow tray or decorative plate lets you arrange them like a museum display. A mesh bag or small drawstring pouch gives a genuinely pirate-y feel.
The rocks are durable once fully dry and will last indefinitely if kept away from moisture. Water will soften and eventually dissolve them — so these are indoor keepsakes, not outdoor ones.
The Color Combo Question
Every time someone makes a batch of Magic Treasure Rocks, the big debate begins: which color combination is the coolest?
Purple and gold is a perennial favorite — regal, luxurious, and deeply gem-like. Deep ocean blue with silver glitter looks like something pulled from the bottom of the sea. Emerald green with gold is pure treasure-chest energy. And there’s something undeniably striking about jet black mixed with holographic glitter that makes kids gasp every time.
But the honest answer? The best color combo is whichever one your kid chooses. Give them the food coloring and the glitter and step back — the combinations they come up with on their own are almost always the most surprising and the most beautiful.
Final Thoughts
Magic Treasure Rocks are proof that the most impressive kids’ activities are often the simplest ones. A cup of baking soda, a splash of water, a few drops of food coloring, and a generous handful of glitter — that’s all it takes to create something that genuinely looks like it belongs in a museum of natural wonders.
The process is engaging, the science is real, and the results are stunning. Whether you make one batch or ten, whether you display them in a treasure box or hide them for a backyard hunt, these little homemade gems deliver a sense of magic that kids carry with them long after the glitter has settled.
So pull out the baking soda, choose your colors, and get ready for wide eyes and big smiles. The treasure is waiting.